> For the complete documentation index, see [llms.txt](https://smartpredict.gitbook.io/smartpredict-ai/llms.txt). Markdown versions of documentation pages are available by appending `.md` to page URLs; this page is available as [Markdown](https://smartpredict.gitbook.io/smartpredict-ai/getting-started/getting-started-part1-iris-classification-project/step-7-test-deploy.md).
# Step 7. Make inferences with our model
After having deployed our project, we should have received the **REST API** **Web Service URL** to use along with an **access token** . Such pieces of information can be copied and pasted by clicking on the copy icon. Those are the compulsory data we need to submit in order to call the AI model's Web Service.
A dialog box notifies that they have been generated successfully. Just click on **OK** and proceed by switching to the **Monitor** tab from where you can always retrieve it later.

## Using Postman to make our first inference
That is it. We have already reached the last stage of our modeling project which is the testing part.
In fact, just like any program , our model needs to be checked in order to evaluate if it duly functions as expected. For the purpose, we are going to use the[ ‘Postman’](https://www.getpostman.com/downloads/) software which is a popular choice among the coders' community.
1. Let us begin by downloading it from its official link :
2. To learn how to perform API testing using Postman, check this [interesting tutorial](https://www.softwaretestinghelp.com/api-testing-using-postman/) .
3. Complete the installation by following every step. Once the software installed, open [**Postman**](https://www.getpostman.com/downloads/) 's GUI.

{% hint style="info" %}
For testing the code generated by SmartPredict through Postman, proceed just like for any automated test.
Collect the **active URL** by copying it from the link provided by SmartPredict then paste it into Postman.
{% endhint %}
2\. Afterwards, click on ‘*New collection*’ from the collection menu,. Let us for instance name it : SmartPredict\_Iris collection. Click on create.
A project folder named “SmartPredict\_Iris” has just appeared on the right . Click on the menu (the three dots). A sub-menu spreads out . Click on ‘Add request’.

\
3\. Fulfill the blank fields as described: Set for **request name** : ‘Test Iris classification ’. Click on the button **‘Save to (the project folder)’**. here ‘SmartPredict\_Iris’ Get back to the project folder >> Click on it , then on the freshly created Test Iris classification request file.

4\. In Postman’s workspace, change **GET** to **POST** by selecting it in the drop-down list.
* **In the Headers part :**
1. Complete the field *Key* with: **Content-Type**
2. Complete the field *Value* with: **application/json**
\> Notice the tick box being checked

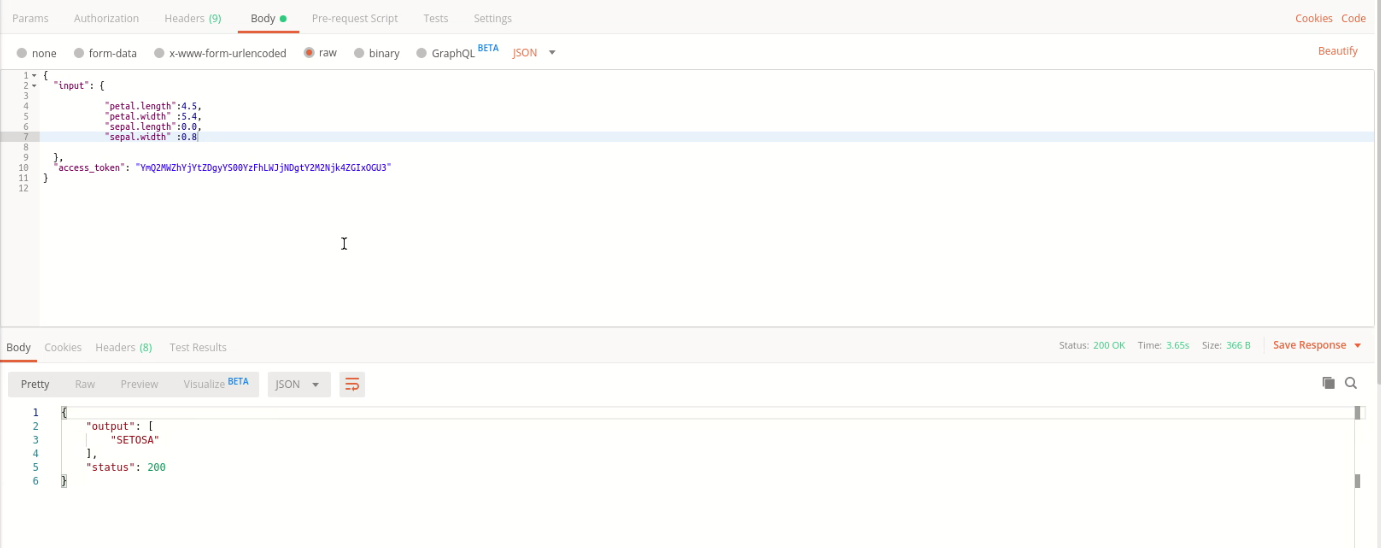
* **In Body :**
1. Among the radio buttons, choose **‘raw’**.
2. From the drop down list, choose the **‘Json’** format.
```
{
"input":{
"petal.length":4.5,
"petal.width":5.4,
"sepal.length":0.0,
"sepal.width":0.8
},
"access_token":""
}
```
> **Paste the access token** copied before into the field intended for it within Postman.
> > Running the test, we obtain the output ‘*Setosa’* for the test set. This means that the model works well.